
Introduction
There are many advantages of using CI servers. They decrease the risk of multiple integration conflicts and reduce rework. Hence, you save your time and money. Still, setting up CI server can be a real challenge even to experienced developers and sysadmins. Although the code management tools seem easy, no one can escape setting issues. You have probably bumped into them already if you dealt with GitLab or Fastlane.
The good news is you can always turn to those who have managed them successfully. We are here ready to share our experience of working with this program. With us, you will learn how to set CI server faster and thus save your precious time for completing other important tasks.
1. Creating a new project in GitLab
Prepare your Mac server by creating a new user, new keychain and installing the required utilities. For that, do the following:
- Creating a system user for CI server
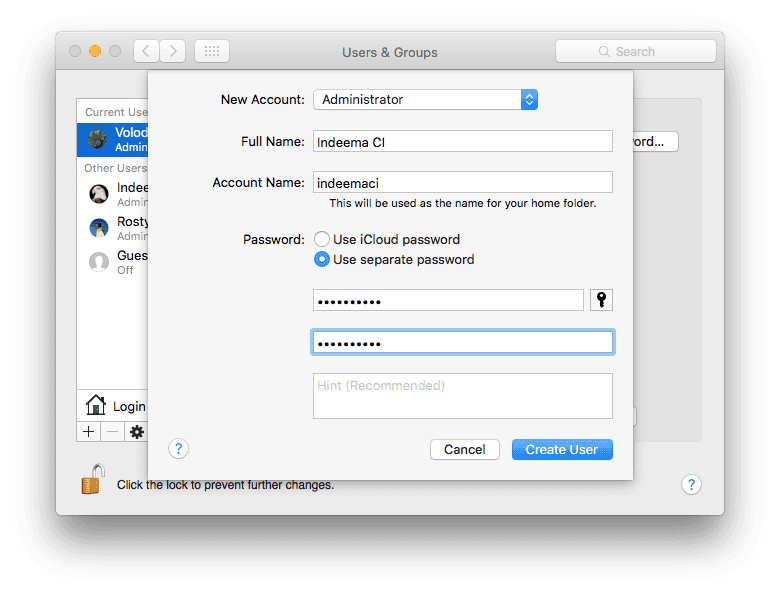
Open System Preferences - Users & Groups
- Create a new user account. Select an Administrator type of account.
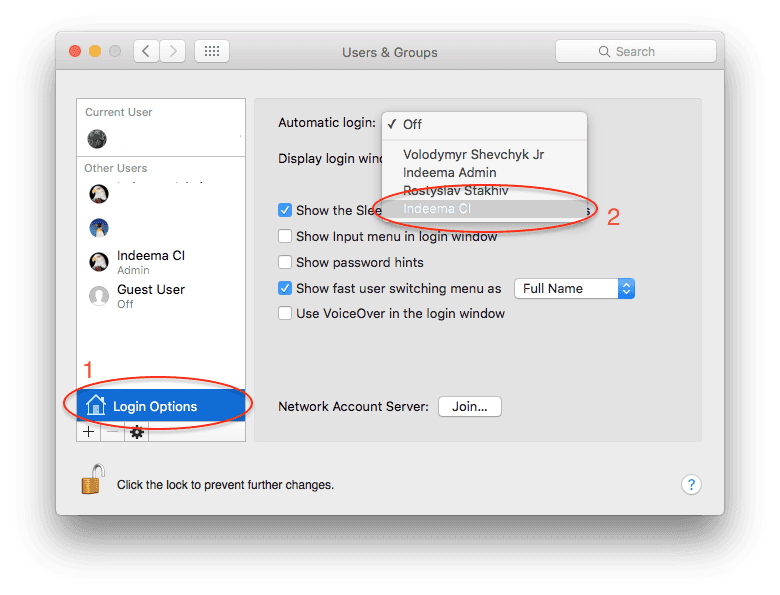
- After user creation, you will have to setup a user account to log on automatically. Select Login options in the left panel and then select a new account for Automatic login option.
- Close System Preferences.
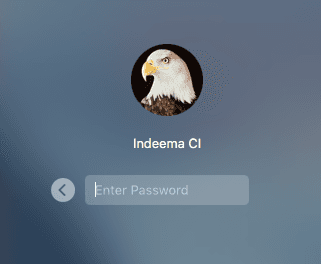
- Log in to start a new session.

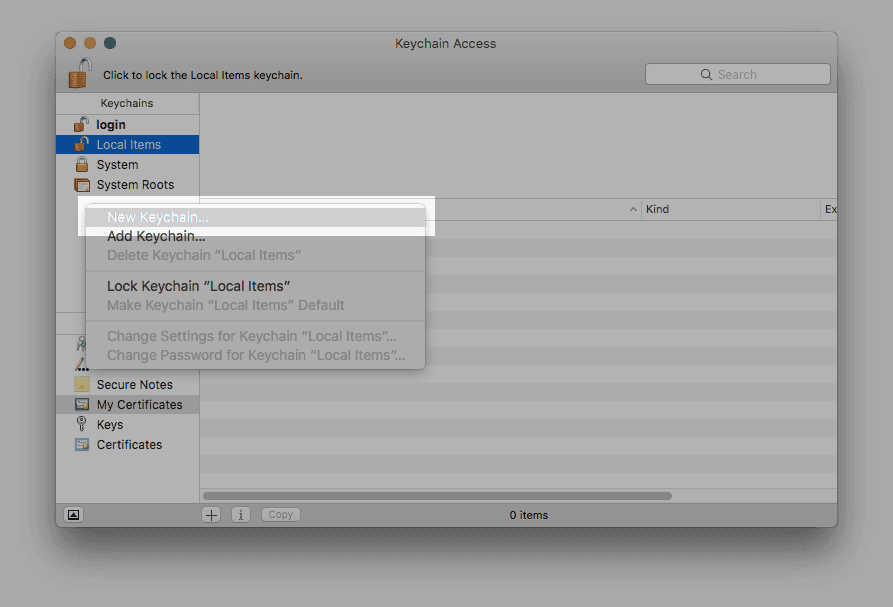
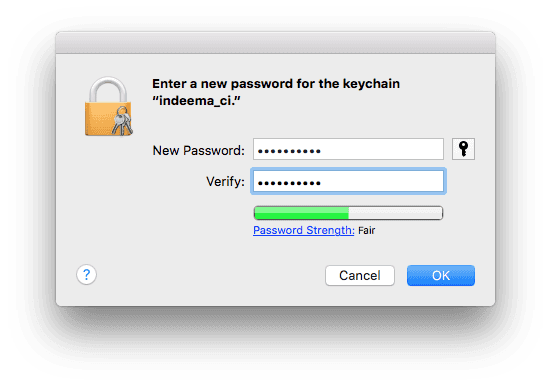
- Create a new Keychain and synchronize it with your account. Open the Keychain Access app. Create a new login Keychain.
- Authenticate with your account login password.
- Set a new Keychain as default.

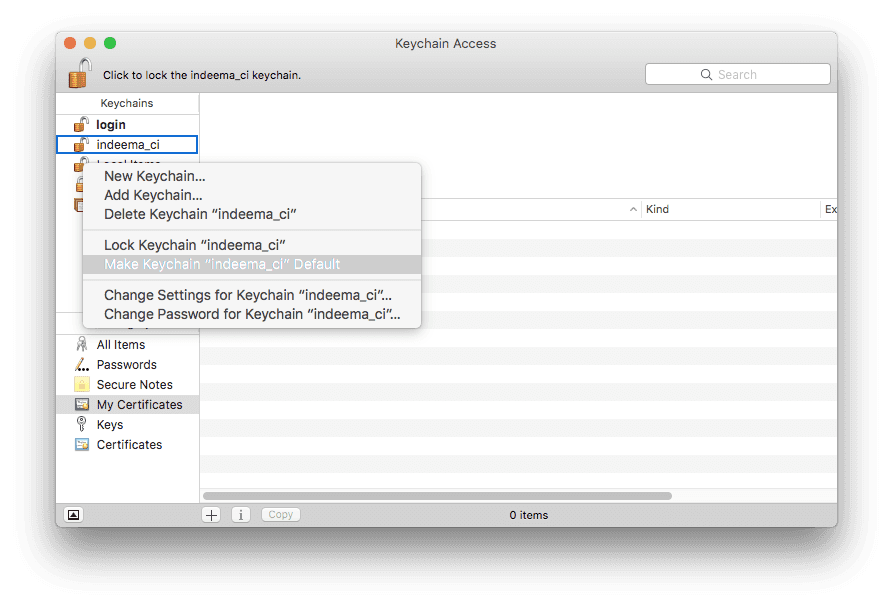
- Now, the utilities will use Keychain as default during build automation and testing.
- Installation of the required utilities.
You will need the following utilities for build automation and testing:
- Xcode. It is easy to install from AppStore.
- Fastlane. Install it using the following instructions.
Open Terminal app. Make sure Fastline meets the following requirements:
- Mac OS 10.9 or newer
- Ruby 2.0 or newer (ruby -v)
- Xcode
Apart from the Xcode installation, you also need the Xcode command line tools set up.
$ xcode-select --install
If you have not used the command line tools before (which is likely if you just installed it), you’ll need to accept the terms of service.
$ sudo xcodebuild -license accept
Install the Fastlane gem and all its dependencies (this might take a few minutes).
$ sudo gem install fastlane --verbose
- GitLab CI runner. You will install this utility later, after the configuration of GitlLab CI server.
- Create a script to unlock Keychain. It is necessary to give other utilities access to Keychain, otherwise, locked by default.
Complete the following steps:
- Create the ssh script using the next code:
$ security unlock-keychain -p <put password here> <put URL to the keychain here>
Call it: unlock_ci_keychain.sh
1.1 How do we know the path to Keychain?
Type the following command into the terminal:
$ security list-keychains
Choose the one that you need from the list.
Change file system permissions for running the script:
$ chmod a+x unlock_ci_keychain.sh
You can use this tutorial to make your script globally executable, meaning able to run from anywhere.
Warning! Make sure the script is globally executable, otherwise the export will not have an effect.
Related: New trend of image editing - iOS apps?
2. Configuring GitLab CI service in GitLab
Now, you have to set up GitLab CI service and connect your Mac server to GitLab portal. If this program is rather new for you, learn more about it here.
It does not matter if you use GitLab for corporate accounts or personal use, the following steps will do for both.
2.1 Log in the system and do the following
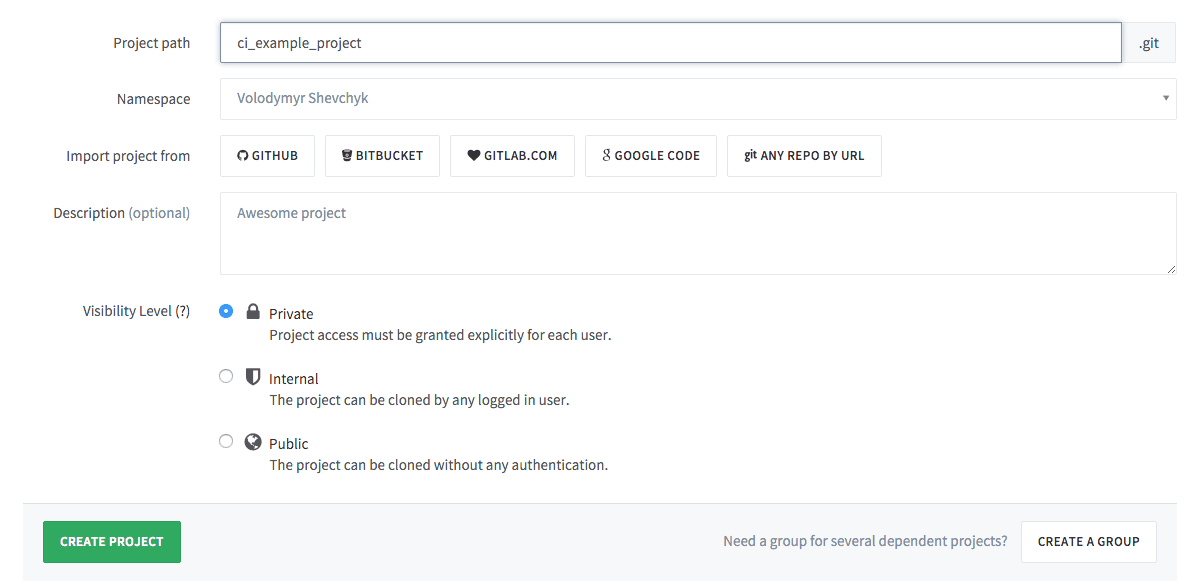
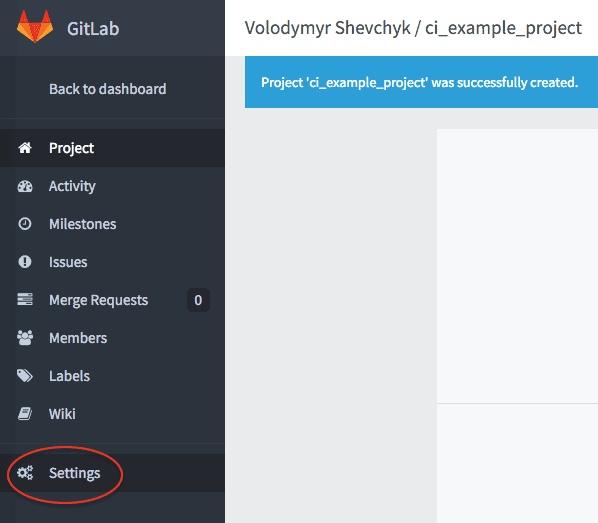
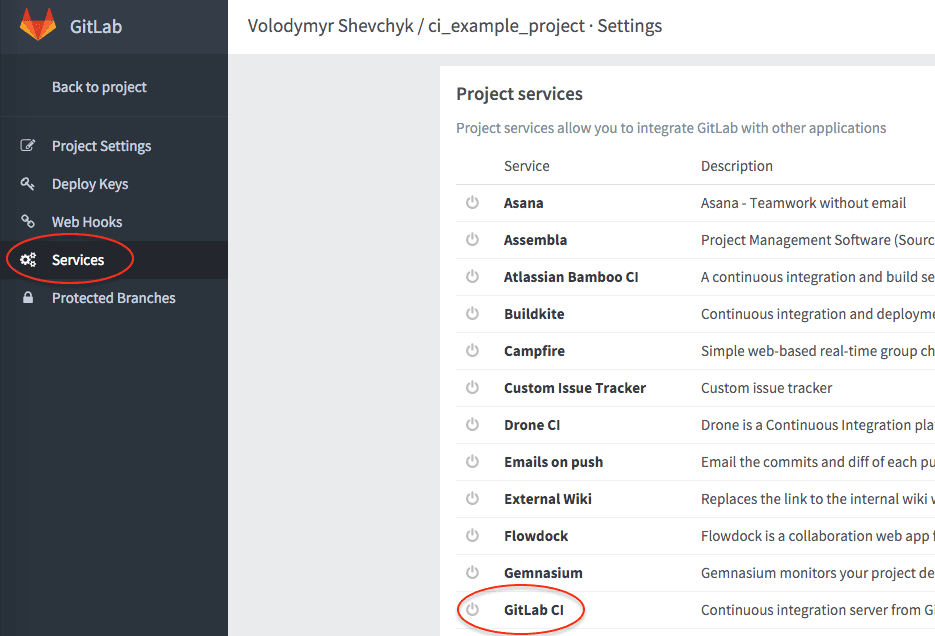
- Start a new project or select the existing one and open it. In my case, I choose to create a new project and call it ci_example_project.
- Activate CI service.
- Click on GitLab CI service in the list of available services Settings - Services.
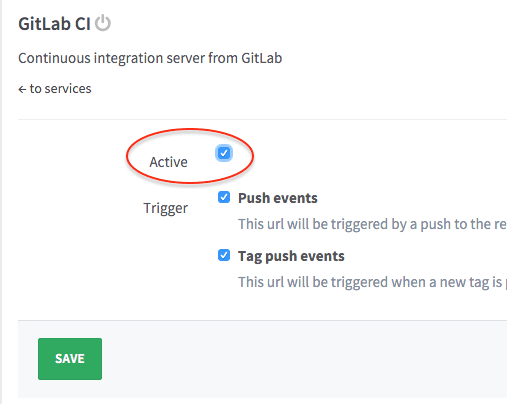
- Activate GitLab CI service and save the changes.
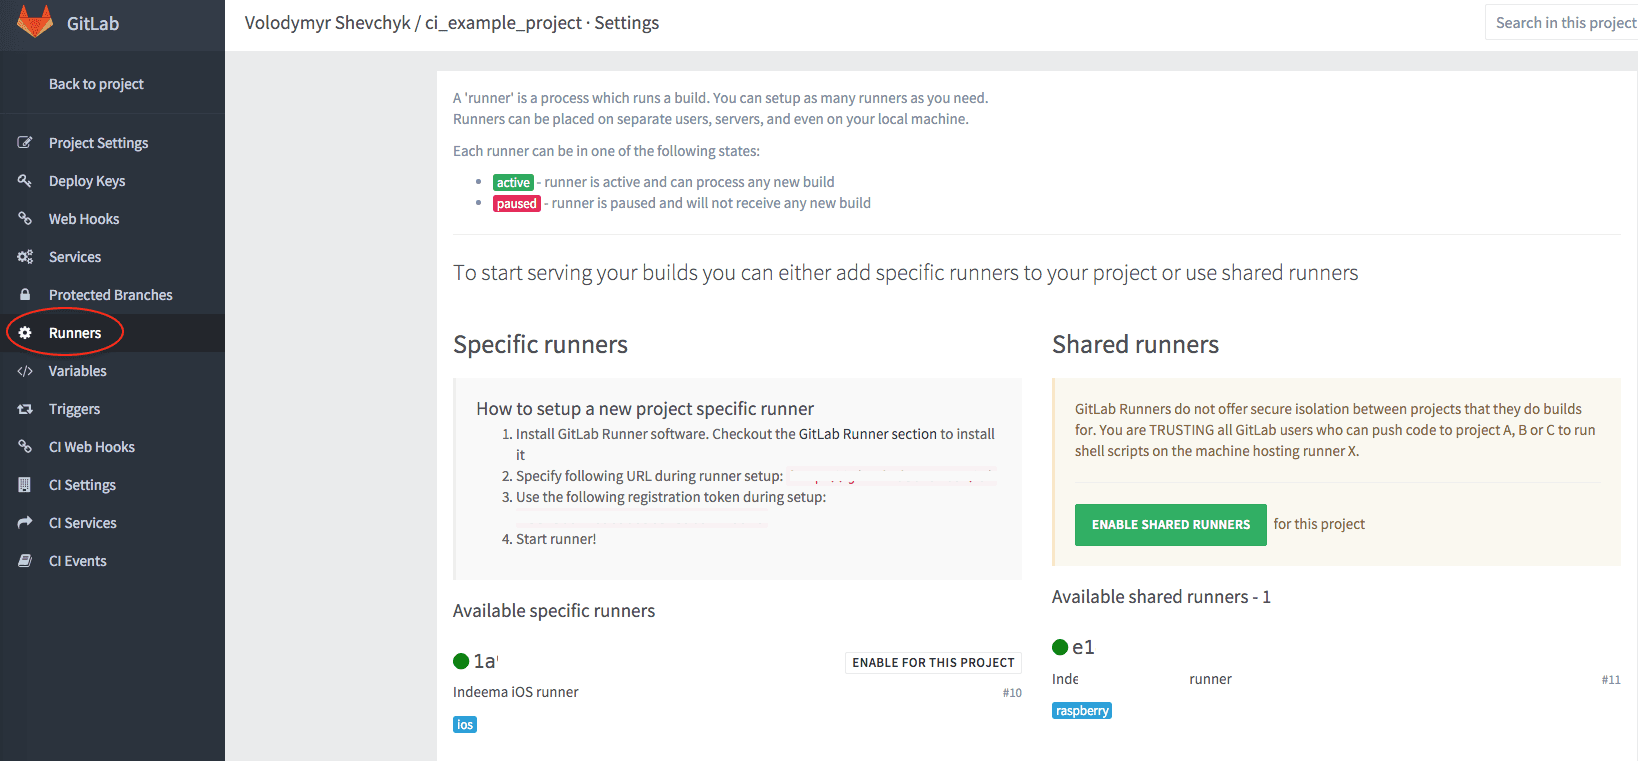
- Additional options will appear in Settings.
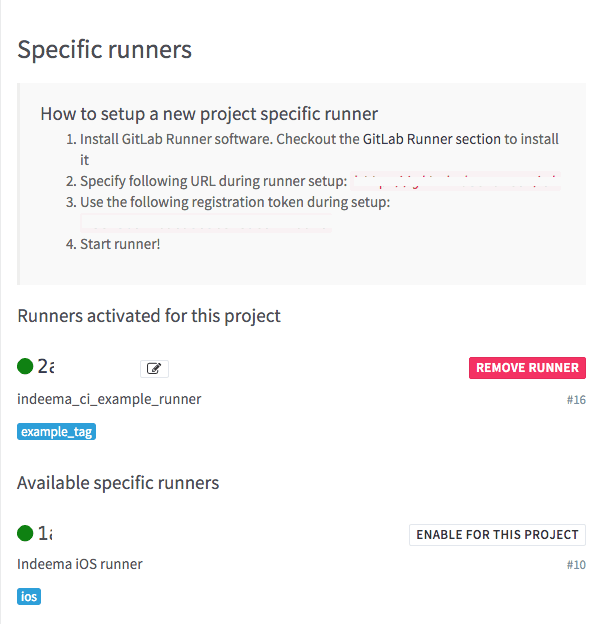
- Create Runner. Select Runners option. Here, you can manage Runners. As you can see, I have two runners one of which is shared.
Install GitLab CI runner on Mac machine using the instruction, and the following data:
- coordinator URL: <from GitLab site, runners page >
- token: <your private token from GitLab site>
- description (you can set any name): indeema_ci_example_runner
- tags (e.g. iOS): example_tag
- executor: shell
Now, update the page with Runners and you will see a new one, which has been just created. It is activated automatically and is connected to the project.
We have created the project in GitLab system. It does not have any files or history yet. We connected GitLab CI runner to the project. GitLab CI runner is started on the local Mac Machine adjusted for build automation.
So far, the runner will be inactive during adding sources to the repository, since .gitlab-ci.yml file for your project is missing. Learn more about this file and its configuration first. Below, you will find how to configure .gitlab-ci.yml file specifically for a certain project.
Our next steps will be:
- Create Xcode project and configure it to build automation.
- Setup Fastlane
- Import a signing Apple Developer Id certificate to CI server.
- Configure .gitlab-ci.yml file.
So, we will create a project and save it in the repository. You can download the final version of the project resource here.
Related: Understanding our iOS development course
3. Preparing Xcode project
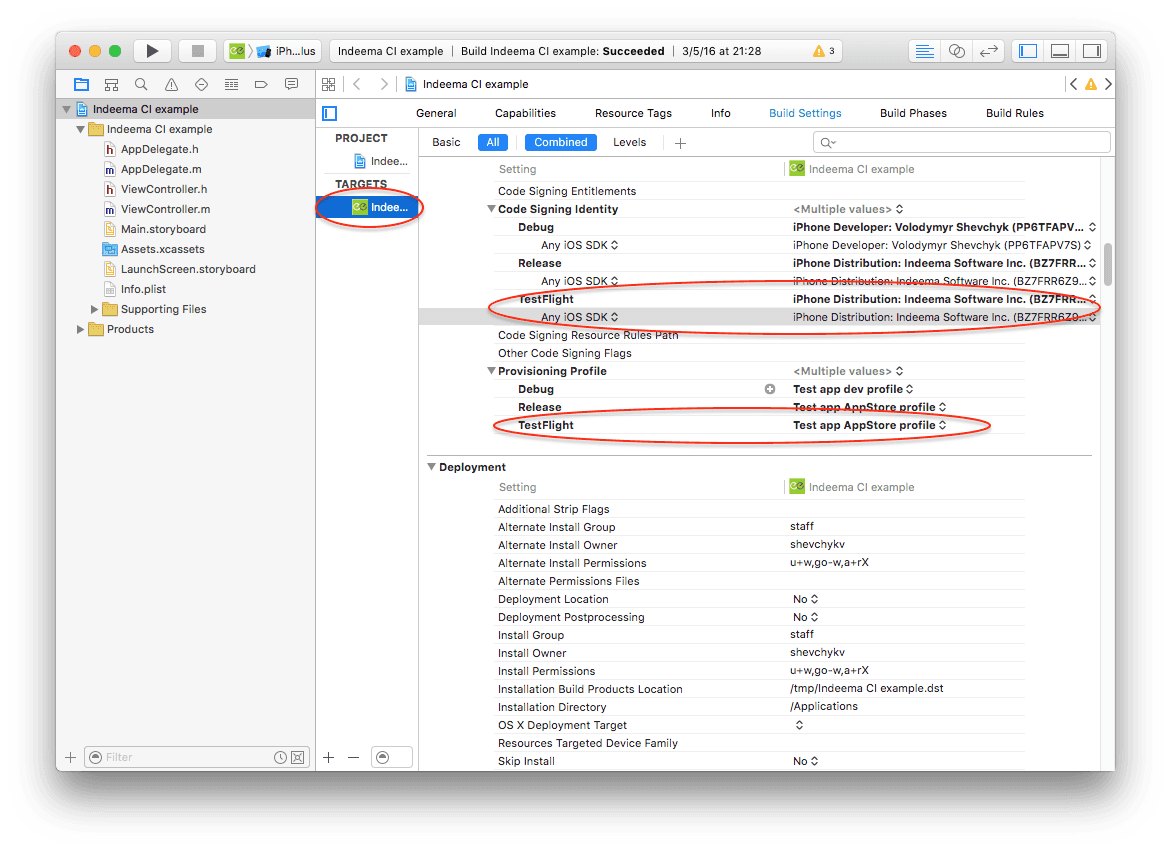
- Add new build configuration in project’s settings, just duplicate “Release” configuration and name it “TestFlight.”
- In Xcode open project settings.
- Duplicate “Release” configuration and name it “TestFlight.”

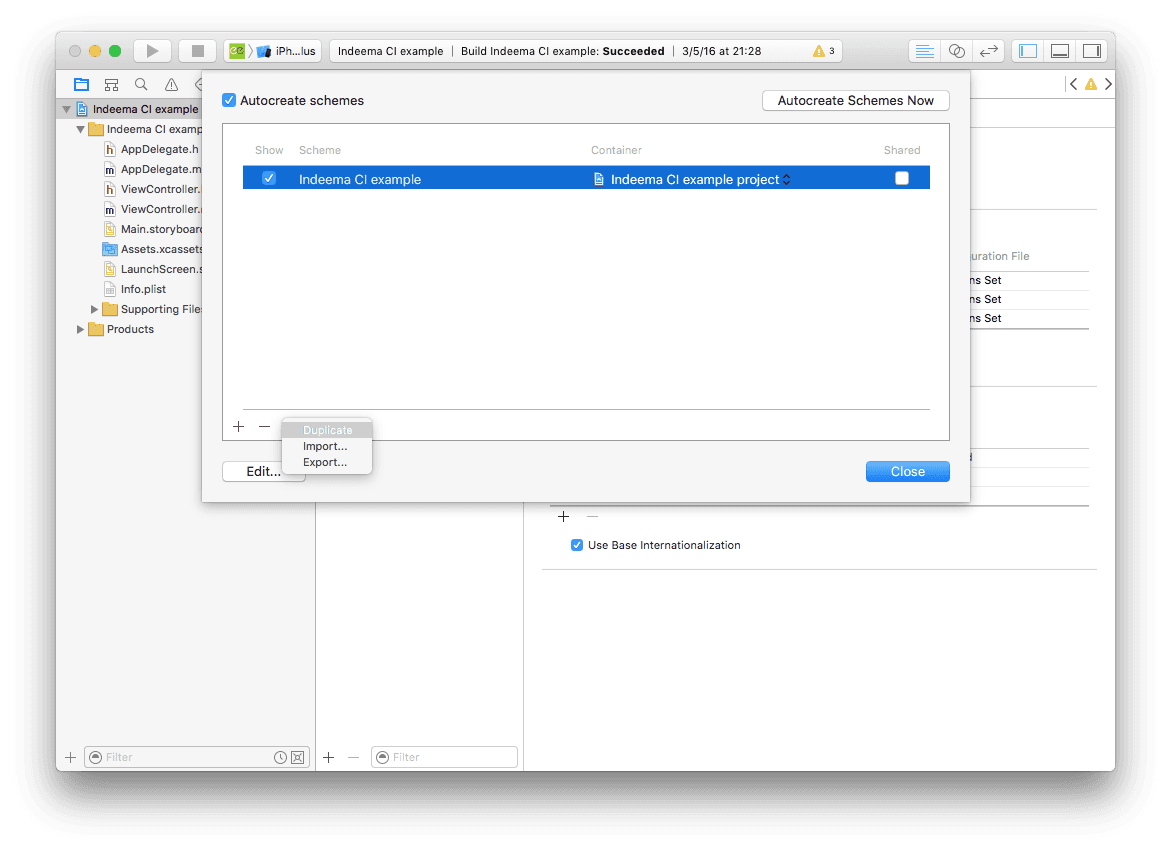
- Add and setup new scheme. Open scheme manager and duplicate your active scheme and make it shared.
- Open “Manage Schemes.”
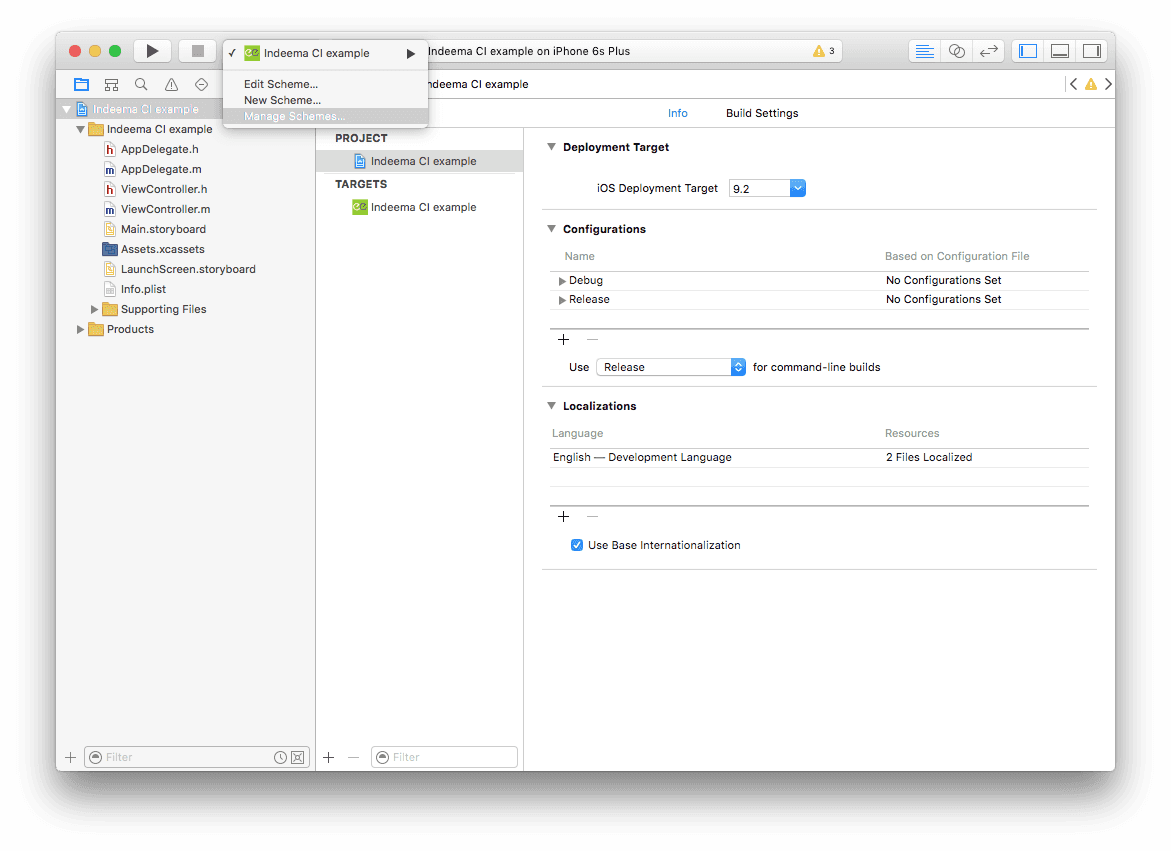
- Duplicate existing scheme.
- Name the scheme “TestFlight.”
- Choose “Archive” option on the left side. Select “TestFlight” build configuration and make it shared.
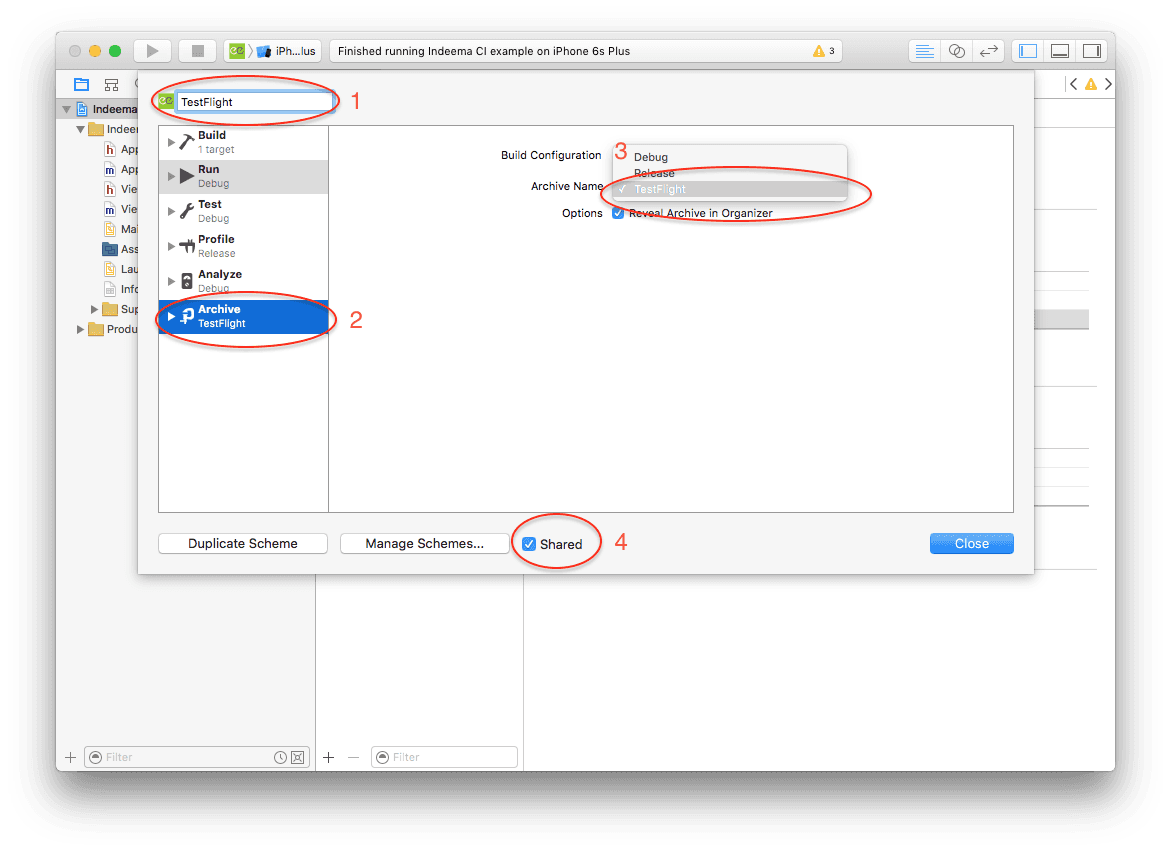
- Setup provisions and certificates for new configuration in the build settings of the target. I’m using AppStore ones, as I’m going to deploy app to TestFlight
4. Prepare Fastlane files
We strongly recommend you to get familiar with Fastlane before completing the next steps.
4.1 Initialize Fastlane
To initialize Fastlane for your project:
- Open Terminal and proceed to the current project’s root.
- Type the following command and accomplish initialization procedure:
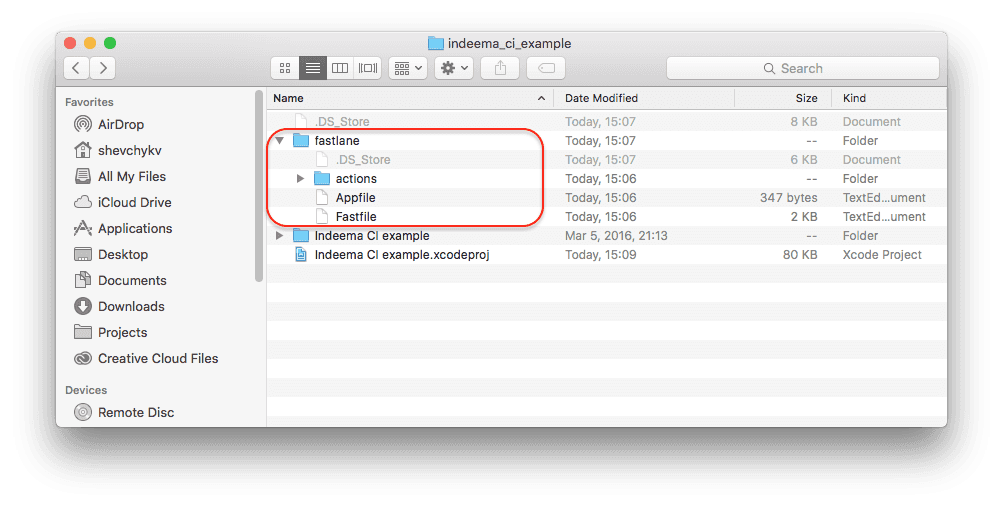
$ fastlane init
- Correct installation will result in a Fastlane folder with files for configuration of the project.
4.2 A configuration of the Fastlane
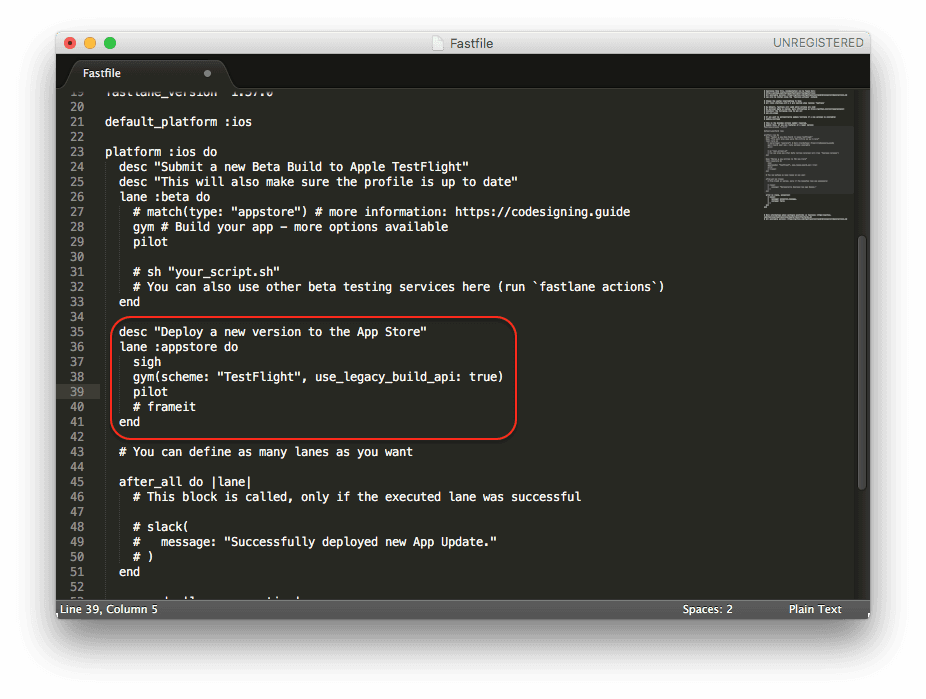
- Configure Fastlane file by setting building scheme for the deploy lane which you added in Xcode project, please look at the picture.
Use any text editor for that. I’m using Sublime Text 2.
I have removed some lanes from the file.
Please check lane named “appstore”. These are 3 active functions:
- sigh - this function gets available provision profiles from the member center depending on parameters from Appfile.
- gym - makes a build and archive of the project.
- pilot - uploads just created archive to the AppStore.
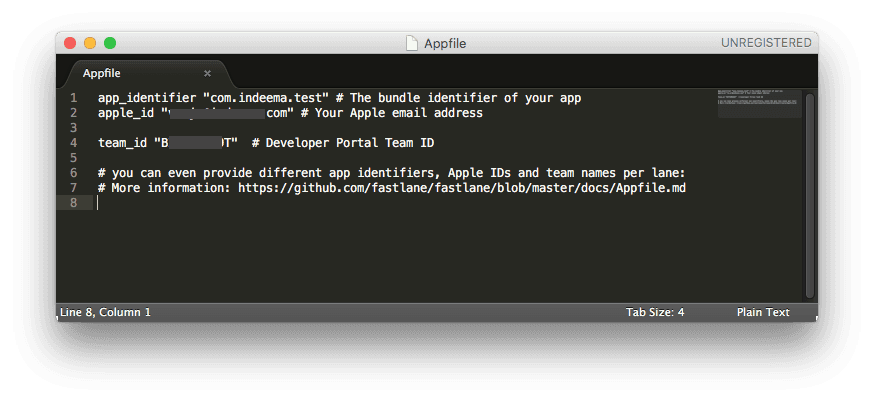
- Configure Appfile file by setting app_identifier, apple_id and team_id, see picture below.
Add .gitlab-ci.yml file to the project
According to Gitlab documentation we should have .gitlab-ci.yml file in the root folder of the repository.
- Open Terminal and proceed to current project’s root.
- Create a file using the following command:
$ touch .gitlab-ci.yml - Open the file via the text editor or Xcode and type the following text.
before_script: - unlock_ci_keychain.shstages: - deploybuild_job: stage: deploy script: - fastlane appstore only: - deploy_branch tags: - example_tag
Here is what I received after completing the task:
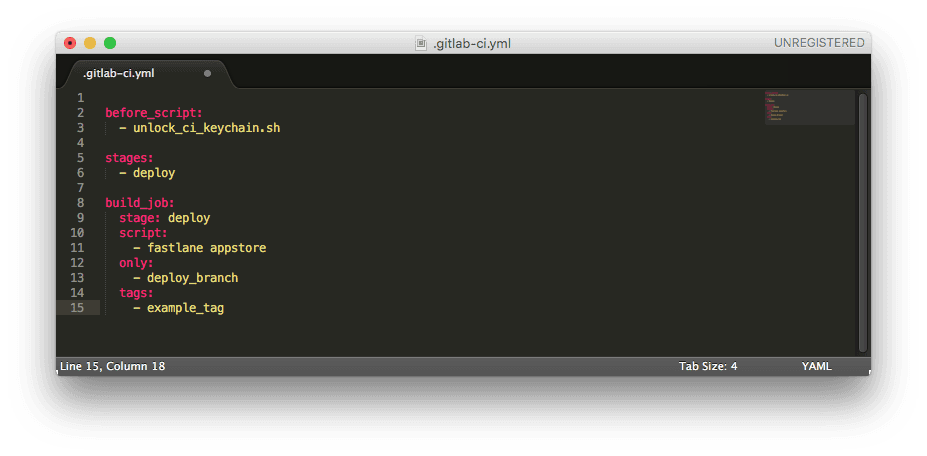
Edit the file with your personal data.
- deploy_branch under the only section means that the current job (deploy_job) will be performed only if a new commit appears in the branch deploy_branch.
- example_tag under the tags section is the runner’s tag we have created a few steps before. Specify the runner tag here. The tags should be identical or the job will not be performed.
Save all the changes to the repository by running the commands commit and push.
Create a new branch with the name indicated in .gitlab-ci.yml file. In my case, it is deploy_branch. Save the branch to the repository. You are likely to find a build with “failed” status in the Builds section on the GitLab web afterward.

In the log, you will see the following:
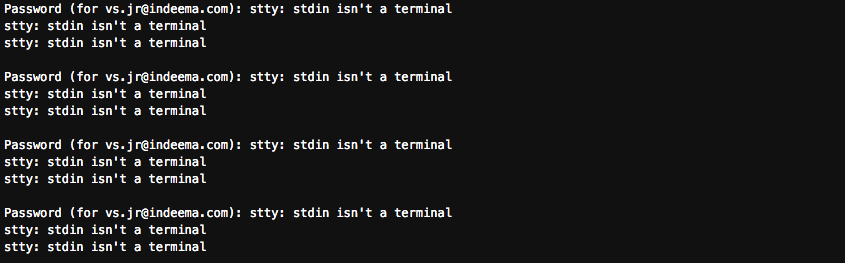
Your runner has to have access to the Apple Id certificate saved in the Keychain.
To make CI server available for Apple Id I will run the following command:
- Open Terminal and login to CI server using ssh. Since both CI server and my machine are in the same network I use:
$ ssh indeemaci@192.168.1.72 - To access keychain from Terminal unlock it running the following command:
$ unlock_ci_keychain.sh - Run the following command to provide Fastlane with access to Apple Id:
$ fastlane-credentials add --username <put Apple ID here>
Then you will be asked for the password for Apple Id.
To add the certificate to the CI server I use the following commands:
Copy certificate(*.p12 file) on the CI server in the home folder using the terminal, BUT not signed in on the server:
$ csh <path to the certificate> indeemaci@192.168.1.72:~/Then enter the password for Indeema CI user.
Log in to CI server.
$ ssh indeemaci@192.168.1.72Unlock keychain calling script:
$ unlock_ci_keychain.shGo to the folder with certificate:
$ cd ~- Install certificate using the command:
$ security import <your copied certificate name> -k ~/Library/Keychains/indeema_ci.keychain -P <password for certificate>
While we suggest this method of installation, feel free to use other ways that will work for you.
Now, you can retry your runner for a specific build by pressing the Retry button.

So far, your build should have been successfully created build and sent to the AppStore (iTunes Connect).
Conclusion
To conclude, if you use GitLab and you need to configure CI service, then GitLab CI additional service is a perfect match. Since this service is adjusted to the work with GitLab, it is a convenient and easy-to-use tool. It allows managing CI server directly in GitLab. Together with Fastlane they constitute a powerful and flexible CI server for iOS on Mac OS.

