This article is about connecting Raspberry Pi as an edge point for sending signals to a light-emitting diode panel using Azure IoT Edge module. We’ll use Azure CLI for the majority of our steps and Azure Portal to deploy Azure IoT Edge.
Here’s what we need for this task:
- Raspberry Pi 3 Model B+ (a light-emitting diode panel)
- Microsoft Azure account
- Azure CLI (the latest version)
- Azure IoT CLI extension
We’ve also described general benefits and features of Microsoft Azure IoT Suite in our previous post. You can explore it at link - Microsoft Azure IoT Suite: Benefits and Features
1. Setting Up Azure IoT
Here we’ll set up the Azure CLI, create IoT Hub and connect our devices. We’ll need to create a device identifier and then authenticate the device in the hub using its credentials. We’ll also need to use add-edge-enabled option to connect our Raspberry Pi to the Azure IoT Edge.
To set up the Azure IoT, follow these steps:
- Install the latest version of Azure CLI on your computer from this website
- Set up Azure CLI using the following command:
$ az extension add --name azure-cli-iot-ext
- Arrange a group of resources for our project:
$ az group create --name rasp-IoT --location westus
- Create gateway for connecting all edge devices to Azure IoT:
$ az iot hub create --resource-group rasp-IoT --name rasp-IoT-Hub --sku S1
- Create identifiers for Raspberry Pi and a device using:
$ az iot hub device-identity create --hub-name rasp-IoT-Hub --device-id myPi001 --edge-enabled
This command will output specific device connection string.
- Copy the output string to a file or in the clipboard. We’ll need it later to connect the device to IoT Hub.
2. Setting Up Raspberry Pi
Once modules of Azure IoT Edge work as containers, we can connect Raspberry Pi to both Azure IoT Hub and Azure IoT Edge:
- Install Docker on our Raspberry Pi:
$ curl -fsSL get.docker.com -o get-docker.sh && sh get-docker.sh
- You can check the version using:
$ sudo docker version
- Install Azure IoT Edge runtime daemon:
$ curl -L https://aka.ms/libiothsm-std-linux-armhf-latest -o libiothsm-std.deb && sudo dpkg -i ./libiothsm-std.deb
$ curl -L https://aka.ms/iotedged-linux-armhf-latest -o iotedge.deb && sudo dpkg -i ./iotedge.deb
$sudo apt-get install -f - Connect our device to Azure IoT Hub using:
$ az iot hub device-identity create --hub-name rasp-IoT-Hub --device-id myPi001 --edge-enabled
We also used this command for creating an identifier for Raspberry Pi.
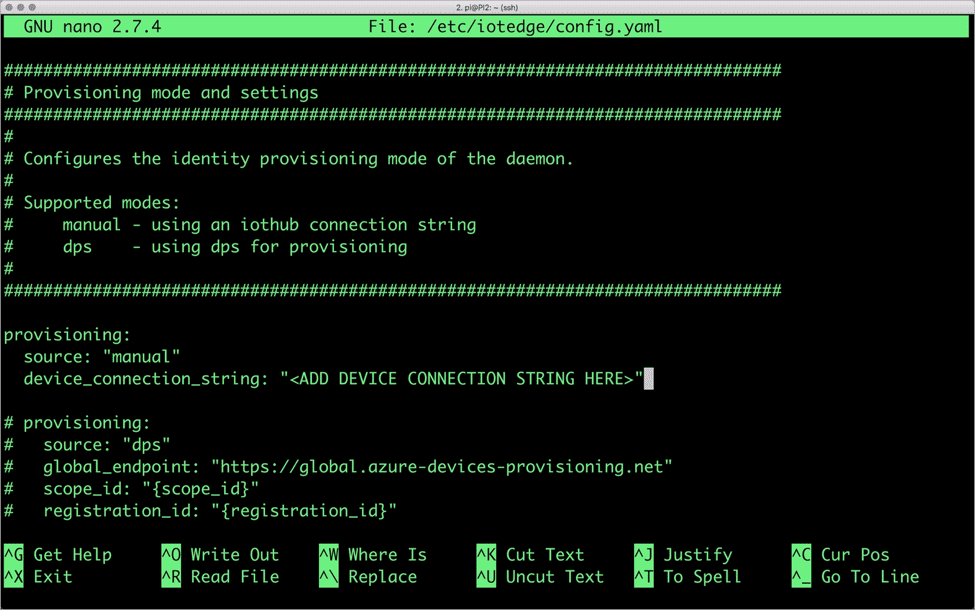
- Open /etc/iotedge/config.yaml file in your preferred editor and replace “<ADD DEVICE CONNECTION STRING HERE>” with the specific device connection string we copied to the file or clipboard.

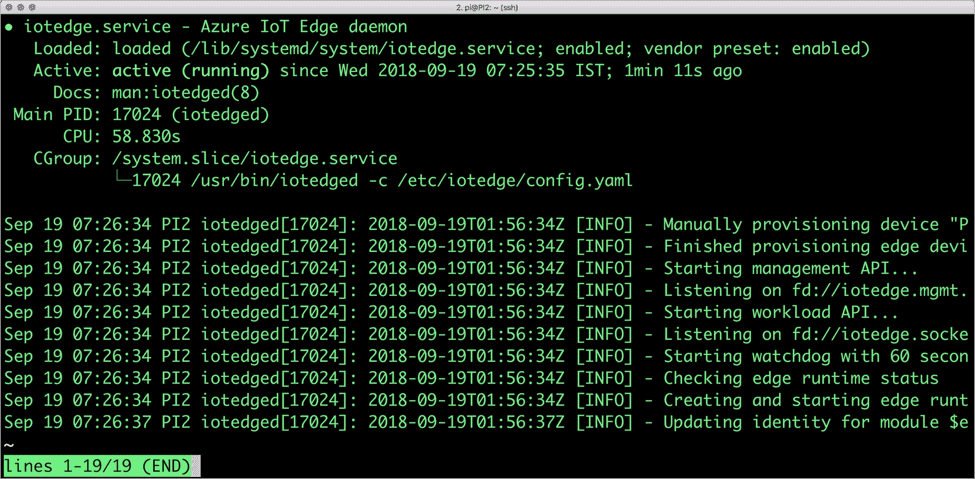
- Restart an IoT Edge daemon and check its status:
$ sudo systemctl restart iotedge
$ sudo systemctl status iotedge
Now we can deploy a module for managing a light-emitting diode panel.
3. Deploying the Modules
Explore a simple example that clearly demonstrates the concept, deployment, and management of Azure IoT Edge modules:
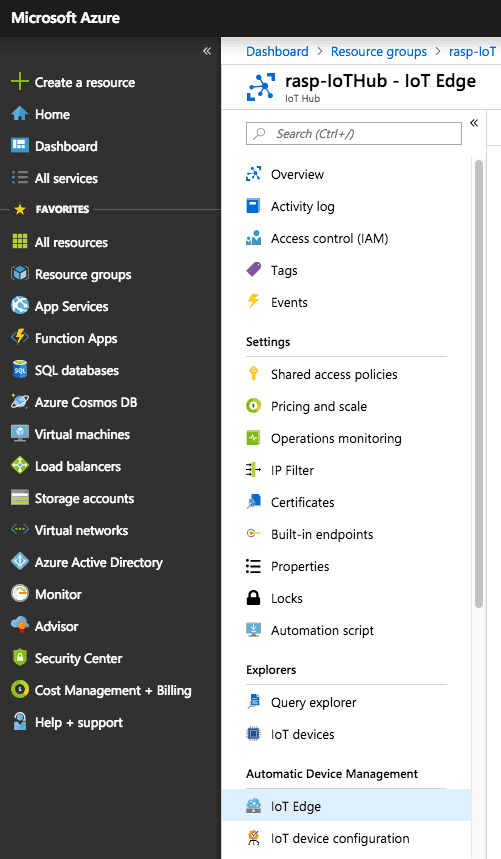
- Open a browser and navigate to Azure Portal.
- Access the IoT Hub and, under Automation Device Management section, click IoT Edge.
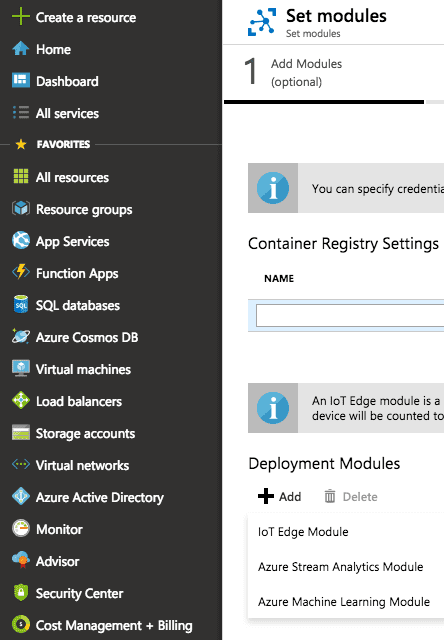
- Under IoT Edge Devices section, select PI1 device, and click Set Modules.
- Click the Add drop-down and select IoT Edge Module to deploy a custom module.

Now we will use Azure portal to deploy a container as a module. Before we start, let’s create a docker image and save it on Docker Hub as an example.
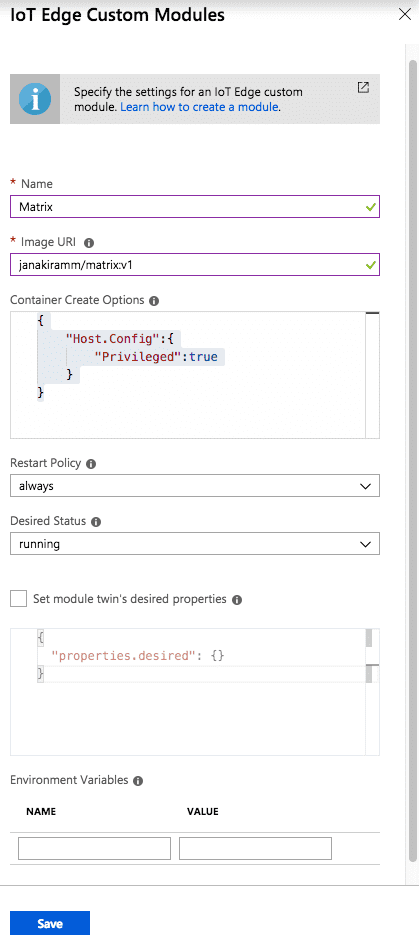
Navigate to the IoT Edge Custom Modules section and follow these steps:
- In the Name field, enter or paste Matrix. This will be the title of the module.
- In the Image URI field, enter or paste janakiramm/matrix:v1.
- Since we access the local I2C bus on Raspberry Pi, we need to run the container in privileged mode. To enable this mode, under Container Create Options, paste the following JSON string.
{
“HostConfig”: {
“Privileged”: true
}
}
- Complete the following steps by accepting the defaults.
- Click Save to accept the deployment.
This will trigger deployment of custom module on the edge device.
You can also verify that the module is deployed to the device using iotedge CLI on Raspberry Pi:
$ sudo iotedge list

When the module is deployed successfully, on the panel connected to the Raspberry Pi the diodes will start blinking.

Using Azure IoT cloud, you can create much more sophisticated and highly functional IoT solutions. For example, while basic functions run locally, you can instantly scale your custom solutions on the edge devices and send only actual data to the cloud.
We find these capabilities very promising and exciting.
4. Azure Decentralization Perks
There is a recent cool feature that distinguishes Microsoft services from other cloud service providers and, in our opinion, executes the WEB 3.0 concept of ultimate decentralization. We, of course, refer to distributed ledger technologies.
Azure Blockchain Workbench introduced the opportunity for blockchain-based innovations using a globally available platform. Frankly speaking, few tools can compete with “wow-effect” pro-developed DApps (decentralized applications) deliver to end users.
However, this is not about blatant crypto craze and ICO hype. Using Azure Blockchain Workbench, developers can add unique capabilities of distributed ledgers to their projects including IoT solutions and thus add value to what their customers get.
The technology of distributed ledgers promises a whole new level of delivering value so that even brief exploration of a relevant cloud service such as Azure Blockchain Workbench requires a separate detailed post. And, of course, we are totally up for the idea of zooming in the Azure Blockchain service if our readers are as excited as we are. Are you? :)
Stay with us, follow our updates, and share your ideas what you’d like to read about next. Thanks for reading!

